IV cannulation procedure for nurses - How to place a peripheral IV catheter (PIVC)
Choose as small IV catheter as possible. Avoid placing it near a flexing joint and make sure you fixate the catheter. Always flush with saline to verify it is in the vein and to clean the catheter.
These are four important steps to keep in mind in the IV cannulation procedure. But there are more to bear in mind. We asked our product manager and registered nurse Pernilla Sjödahl how to place a peripheral intravenous catheter (PIVC) and what to consider before and after insertion.
Follow our step-by-step guides:
How to place an IV catheter: CLiP Winged
How to place an IV catheter: CLiP Ported
How to place an IV catheter: CLiP Neo
Peripheral IV catheters are placed for the administration of drugs and/or fluids when a patient is unable to eat or drink sufficiently, is prohibited from drinking or eating for medical reasons, or is in a condition that requires medications via the blood.
“It is also common to use an IV catheter for taking blood samples, once it is placed for the above reasons. The benefits are to save the patient from additional venepuncture and to save time. The catheter is for short time use only, most common is one or a few days,” Pernilla Sjödahl says.
How to choose the right IV catheter
A rule of thumb is to choose as small catheter size as possible to maintain maximum blood flow around the catheter. A small catheter will also minimise the risk of damage to the blood vessel.
“Always consider the purpose of placing the IV catheter and assess the patient’s blood vessels carefully, never use a larger catheter size than necessary.”
The IV catheters are colour coded depending on size. The colour is correlating to a gauge size (G) according to the applicable ISO-standard.
“The higher gauge size, the smaller diameter of the catheter. The biggest diameter for IV catheters is 14G and the smallest is 26G. This is a bit contradictory, so keep that in mind,” Pernilla Sjödahl points out.
Where to place an IV catheter
The most common site for an IV catheter is the forearm, the back of the hand or the antecubital fossa. The catheters are for peripheral use and should be placed where veins are easy to access and have good blood flow, although the easiest accessible site is not always the most suitable.
“Avoid inserting the IV catheter close to a flexible joint where it may bend. A bent or kinked catheter can be a source of complications. The veins in the antecubital are often easy accessible and also big, but note that this is an often bent joint with high risk to kink the catheter,” Pernilla says. “Again, assess the blood vessels carefully, use your eyes and fingertips. Look for as straight veins as possible and palpate for good elasticity and filling. Try to avoid stiff or very thin veins, also veins under sore skin.”
For the smallest patients, babies and neonates, the veins on the ankle, close to the foot, are often preferred due to easier access there.
Consider this in the IV cannulation procedure
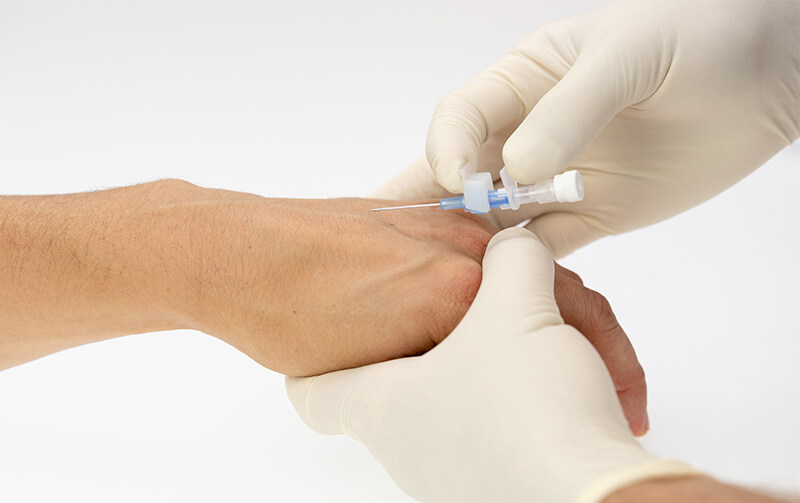
When the best vein available is identified and right size of catheter is chosen, the next step is insertion. First-stick success is always the goal. Any additional attempt of insertion increases pain and stress for the patient, adds workload to the caregiver and costs to the healthcare system. Consider using a heating pad, with caution, to increase venous distension and make the veins more visible and accessible.
It is very important to observe the flashback of blood to know when the needle is in the vein. Flashback will be visible in the chamber connected to the needle as soon as the needle is in the vein. Always continue and insert an additional 1-2 millimetres to let the catheter, not only the needle tip, reach the inner lumen of the vein. Continue to insert only the catheter and carefully withdraw the needle at the same time. You will now see blood between the catheter and needle, the second flashback, which confirms that also the catheter is in the blood vessel.
When working with small babies, neonates or patients with small and fragile veins, it’s important to have an instant blood response. For this reason, with our smaller sizes (24 and 26 G) the needle is notched in a very precise way and place to facilitate blood flashback. This speeds up visual feedback, because blood immediately appears between the catheter and the needle in front of the wing housing.
As soon as the needle is out, you immediately need to close off the luer end of the IV catheter, either with the white cap that comes with the product, or with an extension line or needle free connector of your choice.
“Always fixate the IV catheter carefully to keep it in place and in a stable position. Use a transparent dressing over the insertion site to facilitate regular inspections. You might also need another layer of protection, such as tube or gauze, to further protect the IV catheter and minimise movements and vein irritation.”
Before any infusion or injection, it’s always important to confirm correct placement of the IV catheter and good flow. Flush the catheter with saline and ask the patient if he or she feels the cold coming up the vein. If it’s not a communicative patient, place your fingertips of your non-dominant hand (the one not holding the syringe) at the level of the catheter tip and feel the cold yourself. Also look for any swelling in the tissue.
After placing an IV catheter
Always flush the IV catheter with saline after each usage, to prevent from clotting of blood and be able to use the catheter as long as possible. Attaching an extension line is a common recommendation in guidelines. The extension line could possibly increase the indwell time of the IV catheter as it enables the medical staff to operate away from the catheter, minimising the risk of contamination and movements.
“Remember to fixate also the extension line to avoid getting caught with it hanging from the hand or arm. Be careful with the skin and place a piece of gauze underneath the end of the extension line with its stopcocks or needle free connectors. Always make it as comfortable as possible for the patient,” Pernilla says.
Avoid complications, follow our step-by-step guides:
How to place an IV catheter: CLiP Winged
How to place an IV catheter: CLiP Ported
How to place an IV catheter: CLiP Neo